How to install macOS Mojave on VMware Workstation
macOS Mojave is the latest version of the macOS operating system, you can easily install macOS Mojave on VMware Workstation.
Introduction
macOS is a proprietary operating system that runs on Apple Macs. There are now many techniques you can use to install macOS on your Intel PC (Hackintosh). From Windows, you can use Clover Boot Disk to create macOS Mojave bootable USB with just a few clicks. But not all hardware is supported, and you also need to refer to a lot of documentation so that macOS can be installed and running on your computer.
An easier way to experience macOS right on a computer running Windows or Linux is to install macOS on VMware Workstation. The advantage of this is that you will be familiar with the installation and use without affecting the settings on the computer. By using virtual machines, you can use macOS and Windows or Linux simultaneously. Using virtual disks ensures that all data on the real disks will not be affected. But I noticed running macOS on the VM is very slow, although I set it up to 4GB of RAM.
This article will guide you how to install macOS Mojave on VMware Workstation. I created a virtual disk containing the macOS installer, you just downloaded it, attached it to the virtual machine, and installed it. I’m not sure if VMware Workstation 12 supports macOS 10.14 virtual machines, but version 14 and 15 has support. I tested on VirtualBox and it does not work.
By default, VMware does not provide the option to create macOS and Mac OS X machines. Fortunately there is a tool that helps me unlock this option, this tool is VMware macOS Unlocker. It supports Windows, Linux and MacOS. Skip this step if you were able to create a macOS virtual machine.
- Go to the VMware macOS Unlocker page to download. Click the Clone or download button, then click Download ZIP.
- Power off all virtual machines running and exit VMware.
- Extract the downloaded .zip file in step 1.
- On Windows, right-click on the win-install.cmd file and select Run as Administrator to unlock. For Linux and macOS, run the lnx-install.sh or osx-install.sh files under root (not tested).
- After the unlock process is complete, run VMware to create the macOS virtual machine.
macOS Big Sur management updates
We ran down the Mac management updates after WWDC this summer (see here and here),but here’s a quick overview of the changes that customers will see as they update their Mac fleets to Big Sur.
App lifecycle management
Apple announced at WWDC that macOS is gainingproper app lifecycle management.These capabilities allow admins to manage the app removal in addition to the app install.While there are specific requirements to manage macOS apps, it still brings better control to macOS for Mac Administrators (a long-requested feature).From a Workspace ONE perspective, we’re excited to bring features for store-based app lifecycle management and the ability to expand the volume of apps available to help end users be productive anywhere.
Supervision for User-Approved MDM
Big Sur brings a change for devices enrolled via User-Approved MDM (UAMDM) by classifying them as supervised.We’re excited because supervisionprovides the underlying permissions for Workspace ONE administrators to manage software updates via MDM.It also enables activation lock bypass, enhanced Mac user management and, of course, the use of supervised restrictions.
Kernel Extensions Impacted
Kernel Extensions will run with Big Sur, but only after rebooting the device with a select command to rebuild the Kernel Cache. Admins should avoid Kernel Extensions and the less-than-ideal user experience resulting from their usage. Instead, opt for software that uses System Extensions and use the (up-to) 90-day window to test apps using System Extensions to ensure continued compatibility and great user experiences.
Kerberos SSO Extension
We can now enable the Kerberos SSO extension while users are off-network using per-app tunneling. Per-app tunneling for the SSO extension means that users can be outside the enterprise network, get Kerberos tickets for SSO and manage their Active Directory password.
Install macOS Catalina on VMware on AMD Systems.
When talking about macOS Catalina installation on AMD system, it means it takes all the AMD versions. You might think it should be impossible to install macOS Catalina 10.15 on AMD systems. Indeed the installation procedure needs efforts to handle it. I think the installation on Intel PCs always may be easy without any pieces of stuff. But in case, on the AMD system required some pieces of stuff to do that.
For example. if checked out the installation of macOS Catalina on VirtualBox on Intel systems. We needed only a small piece of code to go overhead to the installation. But in the installation of macOS Catalina on AMD we need some more of them to apply during creating the virtual machine.
What is the AMD System?
AMD is abbreviated from the word “Advanced Micro Devices” is an American multinational semiconductor company that develops computer processors. Also, there if huge differences between AMD and Intel system, according to my conception Intel processors, on average, are far more powerful than AMD processors. This doesn’t necessarily mean we will need Intel through. For the gamer, the AMD processor is plenty powerful enough. When upgrading to the latest version of AMD you will see enough changes in gaming performance. Also, effects on boot time, program loading time, and many more.
How to Install macOS Mojave Final on VMware on Windows PC
At the recent World Wide Developers Conference (WWDC 18) that as held on 4th June 2018, Apple released a new operating system that is now bigger and better. The macOS 10.14 Mojave will be packed with many cool features. Top among these are better security and performance and a new dark mode. The latter is particularly a cool feature that everyone is talking about, and we all want to try it out.
What is macOS Virtual Machine?
A Virtual Machine is one which does not exist physically but is made to exist using the VMWare Workstation software. In this case, you will have a macOS virtual machine that operates on macOS 10.14 Mojave. You have a Windows PC but you can open the virtual machine and have a Mac on the same computer. The VMware Workstation Player is any other application or program on your Windows computer but when opened it takes you to the world of the Mojave; the macOS Virtual Machine.
In order to create this virtual machine, there are various things you will need. One is the Mojave ISO image which is the same one Mac users would use to install the operating system. You will also need to download the VMware Player which is a free program and the Patch Tool. More on these below:
Step 1: Download macOS Mojave
Download macOS 10.15 Mojave
There are many reasons why one would need to create a Mojave ISO file. Whatever your reason, you might need a little help with the process. Here is what to do. Of course, you will need a Mac or Virtual Mac for this step.
Head over to the Mac App store and do a search on Mojave. You will have to click on the download button. When the process is over, the installer will launch, but you won’t be interested in running it because your goal is not to install it on that machine. In any case, do not fret because you can find the installer file in the application folder.
Download macOS Mojave from Mac AppStore
Step 2: Create macOS Mojave ISO File
Now that you have the Mojave app, you need to transfer it to your application folder. These are the files that we need to convert to ISO. For this to be possible, you will need to use to utilize the Terminal. This you can find in Applications > Utilities.
# Create DMG Disk with Terminalhdiutil create -o /tmp/mojave -size 7900m -volname mojave -layout SPUD -fs HFS+J
# Mount DMG Disk to your macOShdiutil attach /tmp/mojave.dmg -noverify -mountpoint /Volumes/mojave
# Create macOS Mojave Installersudo /Applications/Install macOS Mojave.app/Contents/Resources/createinstallmedia —volume /Volumes/mojave —nointeraction
# Unmount Diskhdiutil detach /volumes/Install macOS mojave
# Convert DMG Disk to ISO Diskhdiutil convert /tmp/mojave.dmg -format UDTO -o ~/Desktop/mojave.cdr
# Rename and Move Image File to macOS Desktopmv ~/Desktop/mojave.cdr ~/Desktop/mojave.iso
Step 3: Install the VMWare Player
You can find VMware Player as free virtualization software that can be found at the link provided. Open the link, download VMware and install it in your PC.VMware Player: Free download
Install VMware Player
Step 4: Install Patch Tool

To do this, open the Patch Tool folder. From the files list, right click on “win-install.cmd”. Choose “Run as Administrator”.Patch Tool: Download
Шаги по загрузке и использованию предустановленного образа VMware для macOS 11.0 Big Sur VMware
Вот краткое описание шагов, которые мы будем делать, чтобы установить macOS 11.0 Big Sur в ОС Windows с помощью предварительно установленного файла VMware VMDK.
- Загрузите предустановленный образ VMware Sysprobs и извлеките его.
- Обновляйте свою рабочую станцию или проигрыватель VMware.
- Разблокируйте VMware
- Импортируйте файл VMware VMX из извлеченного места и используйте виртуальную машину macOS 11.0. Наслаждаться!
Подробные шаги
1) Загрузите предустановленный образ VMware ниже. Это торрент-файл, правильно созданный мной. Пожалуйста, подождите некоторое время после загрузки. Это около 17 ГБ в формате 7z.
Этот файл содержит файл диска Big Sur VMDK и файл конфигурации.
2) Извлеките предустановленный образ с помощью 7-Zip или Win RAR. На выходе будет около 23 ГБ. Эта виртуальная машина настроена на 100 ГБ дискового пространства. Итак, убедитесь, что у вас достаточно свободного места в том месте, где вы распаковываете.
3) Убедитесь, что у вас установлена последняя версия рабочей станции или плеера VMware.
4) Разблокируйте рабочую станцию VMware для поддержки macOS в качестве гостевой ОС.
Это очень важный шаг. Apple не поддерживает виртуализацию своей ОС на оборудовании стороннего производителя (но это можно сделать на устройствах Apple). С помощью этого средства разблокировки мы заставляем рабочую станцию VMware поддерживать виртуальную машину macOS.
Загрузите последнюю версию Unlocker со страницы разработчика здесь.
Прочтите наше руководство о том, как использовать средство разблокировки VMware в Windows 10.
После успешной разблокировки при попытке создать новую виртуальную машину вам будет предоставлен следующий вариант. Это только для подтверждения. В этом случае не создавайте новую виртуальную машину.
5) Теперь откройте файл VMX из извлеченного места. Это откроет настройки виртуальной машины.
6) Здесь вы можете настроить параметры оборудования в зависимости от мощности вашего физического компьютера. Если вы можете назначить больше ядер процессора и ОЗУ, это значительно повысит производительность виртуальной машины. Я доволен своим 4 ГБ и 4-ядерным процессором.
7) Мощность ВМ сейчас.
Вы можете получить сообщение ниже, поскольку эта виртуальная машина создана из другого местоположения компьютера. Нажмите на опцию «Я скопировал».
8) Виртуальная машина MacOS 11.0 Big Sur запросит пароль для входа в систему. У этого предустановленного образа имя учетной записи «Sysprobs» и пароль «sysprobs123».
9) Вы должны без проблем приземлиться на рабочий стол.
10) Я настоятельно рекомендую сделать снимок, прежде чем переходить к каким-либо дополнительным действиям.
Эта сборка ОС устанавливается из ванильного ядра на новую виртуальную машину. Он не обновляется и не перезаписывается из других более старых операционных систем. Следовательно, его можно обновить до будущих выпусков из App Store без каких-либо изменений или настроек.

Conclusion
MacOS can be installed on a VMware VM running on ESXi. This can be done after the preparation of a bootable installation image of the ISO format with hdiutil, applying a free patch on an ESXi server and configuring certain VM settings. It is not recommended to install the macOS unlocker patch on ESXi servers that are used in production environments, in order to minimize the probability of any possible issues or negative impacts on production VMs. In this blog post, we have covered the installation of macOS Sierra due to its high popularity among users; however, you can also use the explained logics for installing macOS High Sierra and macOS Mojave on VMware VMs running on ESXi.
Vmware Macos Download
- Download the OSX_10.14.0_Installer.vmdk file. This is an installation image of macOS Mojave. You do not need to use the Hackintosh ISO.
- Select the virtual machine just created, click on Edit virtual machine settings.
- In the Memory section, you can increase the value to make the virtual machine run faster. I increased it to 4096MB (4GB) but macOS still runs very slowly.
- Click Add…, then select Hard Disk and click Next.
- In the Select a Disk Type window, click Next.
- Select Use an existing virtual disk in the Select a Disk window and click Next to continue.
- In the Select an Existing Disk window, click Browse… to select the OSX_10.14.0_Installer.vmdk file that you downloaded in step 1.
- Click Finish, then click OK in the Virtual Machine Settings window.
Install macOS
Now you can boot the virtual machine to install macOS Mojave. I encountered an error when I clicked the Power on this virtual machine button:
VMware Workstation unrecoverable error: (vcpu-0)vcpu-0:VERIFY vmcore/vmm/main/physMem_monitor.c:1279
If you get the same error, you can fix this by adding the line “smc.version = “0”” to the “%ProgramData%VMwareVMware Workstationconfig.ini” file. The easiest way is to run Command Prompt under Admin (find cmd.exe, then right-click and select Run as Administrator), then run the following two commands:
echo.>>»%ProgramData%VMwareVMware Workstationconfig.ini»echo smc.version = «0»>>»%ProgramData%VMwareVMware Workstationconfig.ini»
Ok, my virtual machine has booted, I’ve seen the screen to install macOS.
On the macOS Utilities screen, you need to run Disk Utility to create an APFS partition to install the macOS Mojave.
- In the left column, you will see the virtual hard disk you created above (VMware Virtual…). Select it and click the Erase button.
- Under Name, enter a name for the new partition.
- macOS Mojave requires a partition in APFS format for installation. Select APFS from the Format drop-down list. For older versions, select Mac OS Extended (Journaled).
- Click the Erase button to continue.
- Once you have an APFS partition, close Disk Utility to start installing macOS.
Go back to the macOS Utilities screen:
- Select Install macOS and then click the Continue button.
- Continue to select Continue, then Agree and Agree.
- In the next window, select the APFS partition you created above. Then click Install to install macOS Mojave on VMware Workstation.
- The virtual machine will restart several times until it allows you to set up. Please be patient.
Once installed, you can remove the virtual hard disk that you added in the Add macOS image step. Open Virtual Machine Settings, select the disk and click the Remove button.
It is very important that you install VMware Tools in the virtual machine. Installed VMware Tools will improve the performance and support for additional features. Learn more about installing VMware Tools for the macOS virtual machine at VMware’s Web site.
- Select the VM from the VMware menu, then select Install VMware Tools…
- VMware will automatically mount the darwin.iso file and the VMware Tools icon will appear on the virtual machine screen. Double click on this icon to install.
- Click the Open Security Preferences button if you see the message “System Extension Blocked“.
- You will see the message “System software from developer “VMware, Inc.” was blocked from loading.“. Click the Allow button.
- Restart the virtual machine.
So you have finished installing macOS Mojave on VMware Workstation. Good luck!
VMware Carbon Black and macOS Big Sur
IT Security Professionals who leverage Carbon Black Cloud for macOS will begin seeing a phased rollout of the Carbon Black 3.5.1 sensor the week of December 14th. The 3.5.1 sensor will support macOS 11 Big Sur on both Intel and M1 Apple devices and will offer support for both KEXT and System Extensions. For M1 devices, the release will use Rosetta 2 as VMware continues to work on building native cross compilation support into a future release. Support for delivering KEXT and System Extensions is already included in Workspace ONE UEM making it the ideal delivery method for Carbon Black.
For more information, refer to the Carbon Black Cloud macOS Big Sur Documentation List.
Part 2: Top 5 Alternatives to VMware Workstation Player for Mac
Given below are 5 popular alternatives to VMware Workstation Player. You do not need to download VMware for Mac, instead, check the below options:
1. VirtualBox
Oracle VM VirtualBox is a free and open source software emulator published by Oracle-it is a Intel64 virtualization product for enterprise as well as home use. It is a «virtualization software» which means you can run multiple virtual machines, with different operating systems on the same computer. VirtualBox may be installed on a number of host operating systems like Windows, Linux, Solaris and even Mac OS. VirtualBox has an ever increasing list of features with each new release and supports multiple guest operating systems and platforms it runs on. On May 2018, the latest version of VirtualBox 5.2.12 has been made available for download. It comes with improved stability features and fixes regression.
Download link: https://www.virtualbox.org
2. VMware Fusion
VMware Fusion is a virtual machine monitor developed by VMware for Macintosh computers. VMware Fusion helps to turn your Mac computers compatible to run any Windows like applications like Internet Explorer or Microsoft Office. It is one of the best commercial virtualization app. Running Windows on Mac is only the beginning. Fusion makes it very easy to test nearly any OS and app on a Mac. VMware workstation for Mac is not present but this product is just what you will need. It has features in between that of VirtualBox and Parallels, though early setup can be a long process.
Download link: https://www.vmware.com/products/fusion/fusion-evaluation.html
3. Parallels Desktop
Parallels Desktop for Mac, by Parallels, is software providing virtual versions for Macintosh computers and operating systems specially designed for home users who want to use Windows on their Mac without getting another computer. Parallels Desktop gives Mac users the ability to run Windows at the same time as Mac OS X. Whether it is teams, professionals or IT managers, Parallels Desktop is an easy tool for all. There is a specialized Parallels toolbox with over 30 one touch services like clean your drive, secure private files etc.
Download link: https://www.parallels.com/products/desktop/
4. QEMU (Quick Emulator)
QEMU is a generic and open source full system emulator. As a machine emulator, QEMU can help run programs for one machine on a different machine. Though QEMU’s main host platform is Linux, it also supports operating systems for Apple’s Mac computers. Using QEMU you can run operating systems for any machine with any supported architecture. As QEMU is an open source program, the coding is constantly updated and improved as technical needs evolve. The latest QEMU version available in the market is 2.12.0 updated last in April, 2018.
Download link: https://www.qemu.org/download/

5. JPC(Emulator)
JPC is an x86 PC emulator written in pure Java that is why it seamlessly works on all major computing platforms, including Windows, Linux and Mac OS. It runs as an applet with an integrated debugger. JPC creates a virtual computer using which you can install your favorite operating system in a safe and flexible way. It provides basic IDE and VGA emulation. Also JPC has multilayered security which ensures it is the safest solution you would like to choose.
Download link: http://jpc.sourceforge.net/home_home.html
Creating and Configuring a New VM on the ESXi Host
Copy the ISO installation image of Mac OS X 10.12 Sierra to the datastore by using VMware Embedded Host Client, VMware vSphere Client or WinSCP if you have not yet copied the image. In VMware vSphere Client, click Storage, select your datastore, click Files, and then click Upload files. In VMware Host Client, click Storage, select your datastore, click the Datastore browser, click Upload and select the file to be uploaded. You can see the Sierra.iso file uploaded into the datastore on the screenshot below.
Now let’s consider how you can create and configure a new VM with VMware Host Client:
Right click Virtual Machines and select Create/Register VM in the context menu.
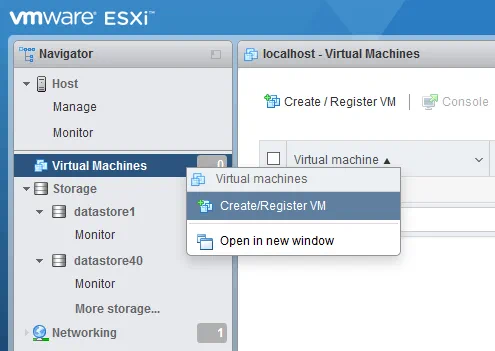
A window of the New virtual machine wizard appears. Click Create a new virtual machine on the first screen, and click Next.
Select a name and guest OS. Enter a VM name, for example MacOS10-12, and select the following VM options:
Compatibility: ESXi 6.0 virtual machine.
Guest OS family: Mac OS.
Guest OS version: Apple Mac OS X 10.10 (64-bit). Select the latest available version in the drop-down menu.
Mac OS as a guest OS family, and Apple Mac OS X as a guest OS version are available after applying the unlocker patch. Click Next to continue.
Select storage. Select the datastore in which you want to store the VM files. The datastore40 is selected in this example. Click Next.
Customize settings. Configure the VM hardware and the additional options. Define the following parameters:
CPU: 2 or more.
Memory: 4096 MB or more.
Hard disk: 30 GB or more (you can use a thin provisioned virtual disk to save storage space).
CD/DVD Drive: Select the Datastore ISO file, check the box Connect at power on, click Browse and select the ISO file (Sierra.iso) as DVD media from your datastore.
After configuring the VM settings click Next.
Ready to complete. Review your VM settings and click Finish to create the VM.
Now you can try to run the VM. Make sure that the boot order is configured correctly, and that the VM is configured to boot from the DVD drive. If you run the virtual machine on VMware ESXi, you would now see the following issue: the Mac OS X Sierra 10.12 installer hangs when the progress bar approaches 90%.
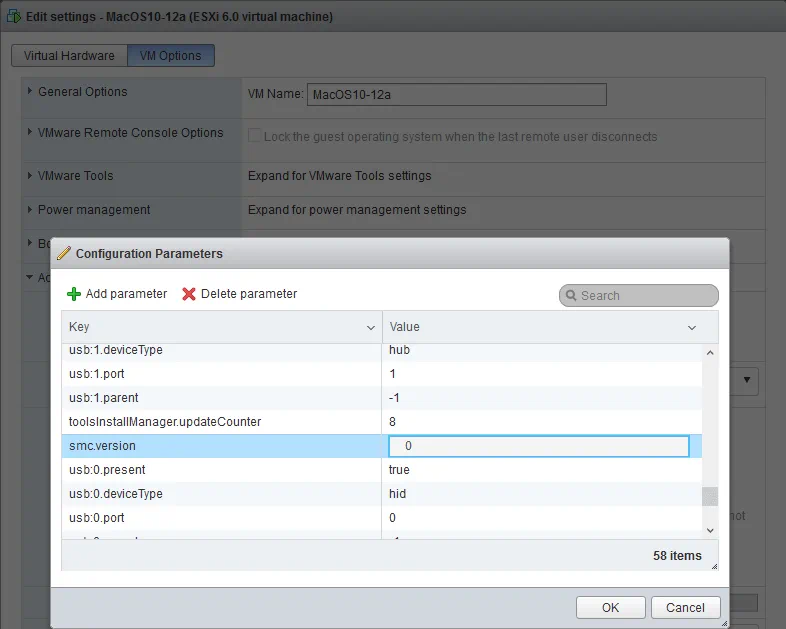
Let’s configure the VM to fix this issue. The smc.version = «0» string must be added to the virtual machine VMX configuration file. Right click the VM in VMware Host Client, then click Edit settings in the context menu. Click VM options > Advanced > Edit configuration. In Configuration Parameters click Add parameter. Click to edit the new key and type smc.version in the Key column. Then click the value and enter (see the screenshot below). Another solution is to downgrade the VM hardware version to 10.
You can also use the SSH client to edit the VMX file in the console. Power off the VM. Log in to the ESXi server with an SSH client such as PuTTY.
Go to the directory of your virtual machine:
cd /vmfs/volumes/datastore40/MacOS10-12
Edit the VMX configuration file of the VM with vi:
vi MacOS10-12.vmx
Press o to add a new line.
Enter smc.version = «0»
Press Esc, type :wq and press Enter.
Now power on the virtual machine and start installing Mac OS X 10.12 High Sierra on the VM that is running on the ESXi host.
How to Test Workspace ONE Features for macOS Big Sur
As we release feature support for macOS Big Sur, you’ll find them first in our User Acceptance Testing environments, such as CN135, CN137 and CN138.We encourage all of our customers to work with their sales or support account teams to ensure they have access to their UAT environment.We continue to update our “Getting Ready” KB article for more details on supported features.
To reiterate, there’s one issue we’re working on for M1 Macs, which will be fixed in Workspace ONE Intelligent Hub 20.11.1. Again, over time we will be converting our macOS Workspace ONE apps to Universal apps to offer native support for Apple silicon.
As we announced at VMworld,we’ve been rolling out a bunch of training and community resources for Mac admins. Just this week, we rolled our new macOS management training course.
Steps to Download and Use macOS 11.0 Big Sur VMware Preinstalled VMware image
Here is the quick recap of the steps we will be doing to install macOS 11.0 Big Sur on Windows OS by pre-installed VMware VMDK file.
- Download the Sysprobs pre-installed VMware image and extract it.
- Keep your VMware workstation or player updated.
- Unlock the VMware
- Import the VMware VMX file from the extracted location and use the macOS 11.0 virtual machine. Enjoy!
Detailed Steps
1) Download the pre-installed VMware image below. It is a torrent file, properly created by me. Please allow seeding for some time after downloading. It is around 17GB in 7z format.
This file contains the Big Sur VMDK disk file and configuration file.
Download VMware Image
2) Extract the pre-installed image by using 7-Zip or Win RAR. The output will be will around 23GB. This VM is configured for 100GB disk space. So, make sure you have enough free space at the place where you are extracting.
3) Make sure you have the latest VMware workstation or player.
4) Unlock VMware workstation to support macOS as guest OS.
This is a critical step to complete. Apple doesn’t support to virtualize their OS on non-Apple hardware (but it can be done on Apple devices). Using this unlocker, we are making the VMware workstation support macOS VM.
Download the latest version of Unlocker from the developer page here.
Read our guide about how to use the VMware unlocker on Windows 10.
The successful unlock shall give you the below option when you try to create a new VM. This is just for confirmation only. Do not create any new VM in this case.
5) Now open the VMX file from the extracted location. This will open the virtual machine settings.
6) Here you can customize the hardware settings based on the power of your physical computer. If you can assign more processor cores and RAM, it will boost the performance of VM dramatically. I’m satisfied with my 4GB and 4 core processor.
7) Power of the VM now.
You may get the below message since this VM is made from other computer location. Click on the “I Copied It” option.
8) The macOS 11.0 Big Sur VM will ask for a password to log in. This preinstalled image has the account name “Sysprobs” and the password is “sysprobs123”.
9) You must land on the desktop without any issues.
10) I highly recommend taking a snapshot before proceeding to any additional steps.
This OS build is installed from the vanilla kernel on a new virtual machine. It is not upgraded or overwritten from any other older Operating Systems. Hence, this can be upgraded to future releases from the App Store without any modification or tweaks.
Additional Setup and Cross Check
Few things you can customize to make this VM useful.
a) Network
The network worked out of the box. By default, it was configured in NAT mode. If you have the Internet access on the host computer, the VM is going to get the connection inside the guest virtual machine.
b) VMware shared folder between Big Sur and Windows 10
If you need to transfer data between macOS 11 Big Sur VM and Windows 10 host, setting up VMware shared folder is the ideal way. Instead of creating network shares or enabling clipboard sharing, this method can be smoothly done for effective data transfer.
- Make sure that the latest VMware tools are installed on the macOS guest VM.
- Decide (or create) the folder on the host computer (Windows 10) that you want to share to Big Sur macOS.
- Go to virtual machine settings and enable Shared folders under ‘Options’. Select ‘Always enabled’ option.
- Reboot the virtual machine to take effect. Or you could complete the earlier settings while the virtual machine is switched off.
- That should mount and show the additional shared disk under Computer in macOS.
If you haven’t enabled ‘Read Only’ access while settings up this shared folder, you should be able to read and type on the Windows 10 share which is working through VMware shared folder feature.
Wrap Up
I hope this guide and the VMware Pre-installed image of macOS 11.0 Big Sur is useful to test and play around with the latest OS from Apple.
This method is only for testing and learning purpose. Though the performance of the virtual machine is not that bad on Windows 10 computer as guest VM, it is highly recommended to use the Apple hardware for their OS to get maximum advantages.
As the Big Sur is in beta stage at the moment, I will be updating this post and VMDK file once the final public version is available. But as I mentioned earlier, this build can be upgraded to any release from Apple. Hence you are free to upgrade to the latest beta or final versions after taking a snapshot.
If you think this post is useful, please share and leave your comments about the issues and success notes you faced with the installation and also about the performance of this VM on your Windows hardware.
Download OS X
You can install OS X Lion, Mountain Lion, Mavericks, Yosemite, or El Capitan into a virtual machine on your Mac computer. Before you get started with the download method, you need to grab a copy of the OS X installer from the App Store.
To do this, open the App Store and download your version of OS X. In my example, I am running El Capitan, so that is what I will download. It’s listed on the right hand side in the list of links.

Click the Download button and the install app will be downloaded to your Applications folder in OS X. The download will be several GBs in size, so it could take a while for the download to complete.